Easily host game servers with AMP
A guide to setup AMP - Game Server Control Panel
What is AMP
AMP (Application Management Panel) , developed by CubeCoders, is a powerful self-hosted control panel designed to make game server hosting hassle-free. With its intuitive user interface (UI), AMP takes the complexity out of creating and managing game servers, offering a streamlined experience for both beginners and advanced users.
One of the key features of AMP is its ability to handle advanced tasks effortlessly. It supports automated backups, including the option to upload them to the cloud, and offers task scheduling for running CLI commands, checking for updates, and more. Additionally, the UI includes a built-in text editor with syntax highlighting, making it easy to edit configuration files directly from the browser.
For those needing faster file transfers, AMP also comes with a built-in SFTP server. Each game server is isolated in its own instance, ensuring simpler backups and more efficient hardware management, making AMP an ideal solution for anyone looking to host and maintain game servers.
Supported Games
AMP offers broad support for a variety of popular games. Below is a list of the main games AMP can manage:
- Minecraft (Both Java and Bedrock editions)
- Palworld
- 7 Days to Die
- Satisfactory
- ARK: Survival Evolved
- Valheim
- Rust
- Counter-Strike: Global Offensive
- Sons Of The Forest
- Space Engineers
- Factorio
- Project Zomboid
- V Rising
- ARMA III
- Conan Exiles
- Terraria (Including tModLoader)
- Garry’s Mod
- Euro Truck Simulator 2
Here’s the full list of supported games.
Beyond games, AMP also supports hosting NodeJS and Python applications, adding even more flexibility to this robust platform.
Pricing Structure
AMP currently offers 4 tiers (Editions). The Standard Edition, priced at a one-time payment of €9.50, is ideal for individuals or small groups who want to run a few game servers on a single system. With support for up to 5 app instances and 3 panel users, it offers a cost-effective entry-level solution with community support.
The Professional Edition, available for €19 as a one-time payment, is tailored to power users who need to manage multiple systems or a larger number of game servers. It supports 15 app instances, allows for unlimited panel users, and enables multiple server management, making it a popular choice for more advanced users.
For larger server networks or businesses, the Advanced Edition is a great fit. At €38 for a lifetime license, it supports up to 50 app instances and comes with additional features like in-game analytics, priority support, and custom branding. This edition is perfect for users managing large-scale game networks.
Finally, the Enterprise Edition is designed for commercial resellers and large organizations. Starting at €19 per month, it offers flexible instance limits, automated deployment APIs, and integrations with WHMCS and WemX. This tier is ideal for businesses looking to provide AMP as a management platform for their customers.
| Edition | Features | License Type | Price |
|---|---|---|---|
| Standard Edition | - 5 App Instances - 3 Panel Users - Single-System Management - Community Support |
One-time Payment | €9.50 EUR |
| Professional Edition | - 15 App Instances - Unlimited Panel Users - Multiple Server Management - Community Support |
One-time Payment | €19 EUR |
| Advanced Edition | - 50 App Instances - In-game Analytics - Priority Support - Instance Deployment Templates - Custom Branding and SSO - All features from Professional Edition |
One-time Payment | €38 EUR |
| Enterprise Edition | - Commercial Usage - Flexible Instance Limit - Automated Deployment API - WHMCS/WemX Integration - Centralized Instance Overlays - All features from Advanced Edition |
Subscription | Starting at €19 EUR/month |
Installation
In this guide I will show the installation of AMP inside a proxmox LXC Container, so If your’e installing on bare metal or already have a container setup jump to the installing AMP section
If you prefer a visual guide here’s the official video guide from cubecoders.
Creating the Container
To create the LXC container start of with the Ubuntu LXC script from PVE Helper-Scripts:
bash -c "$(wget -qLO - https://github.com/tteck/Proxmox/raw/main/ct/ubuntu.sh)"Then run that script on the shell of your PVE node, after running the script you will be asked to use default settings or go into advanced mode and customize the install, I usually stick to the defaults and then edit what I need later on. Although are no official minimum requirements and AMP can run on systems such as raspberry pi even with 512mb of ram I still recommend that you give the LXC at least 2GB of ram, 10GB of storage and 2 cores. Please note that the previously mentioned specifications should be tunned for the your target game server (or servers).
Despite AMP having it’s internal backup mechanisms I also recommend enabling auto backups inside of proxmox.
After the container is created (and resources properly provisioned) set the locale to UTF8 by running the following commands, as root, inside the container:
- localectl set-locale LANG=en_US.UTF-8
- set LC_ALL=en_US.UTF-8
- locale-gen
Installing AMP
Start off by logging in to the root user of your LXC (or server) and make sure the locale is set as UTF8 then run the following command
bash <(wget -qO- getamp.sh)If everything else is well setup in your system the script should run as expected and present you with the option to choose the user credentials that you will use to login to the web interface. After the user is chosen you will be asked if you want to install docker to run instances isolated from your OS. I recommend you say yes to this option if:
- Amp is running on bare metal
- You plan on having multiple people accessing your instance
- You want to run windows based applications.
I should also note that installing docker might not be your best option if your system is resource limited because although small this option will cause a negative impact on performance.
Since I’m already running AMP inside a proxmox LXC and I’m the only one who will administer this instance I will say no this option and run everything directly on the host.
Then you’re going to be asked a few more questions on what software you want to run on this instance which you should reply based on your needs.
To finish it off you will be asked if you want to enable HTTPS, this option is again highly dependent on your setup so if you want to directly expose AMP to the internet say ‘yes’, if you plan to only use AMP locally or run it behind a reverse proxy say ‘no’. Since I only want to access this AMP installation on my local network I will say ‘no’. After this questions you should be presented with a recap of your options and if everything looks good press ‘enter’ to continue or ‘ctrl+c’ to cancel.
If you chose to continue AMP should proceed to install all the necessary components, the time the installation takes can vary depending on your system specifications and internet speed.
After the installation is completed you should be presented with an URL to access your instance, copy that url (DO NOT USE CRTL+C) and paste it on your web browser to complete the setup.
At the web UI log in to your previously created user, click ‘next’ and then paste in your license, after that click ‘next’ again. Next choose the Operation mode, for this installation I will choose standalone. Then choose what data you want you want to allow AMP to collect and click ‘next’. If everything is working as expected restart AMP and you should be all good to go.
After AMP is restarted log back in to the web ui.
Creating a instance
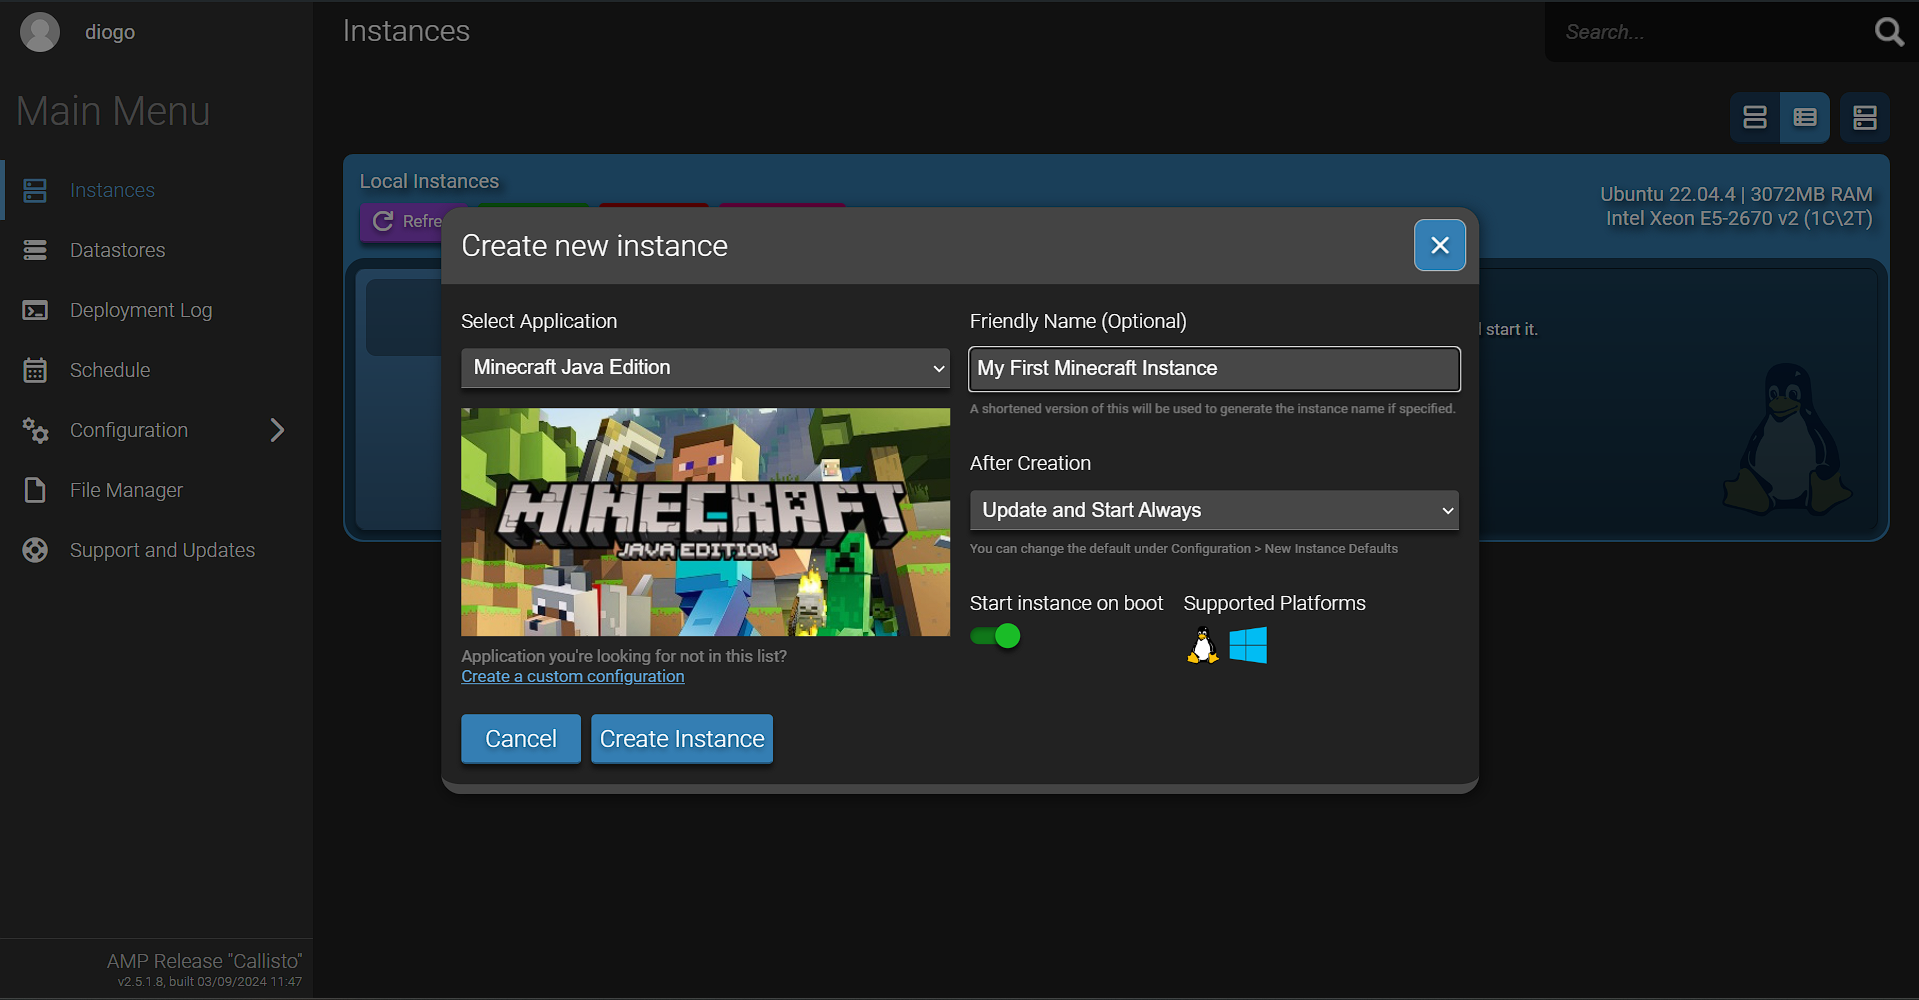
To create an instance log in to the web UI and press the “Create Instance” button and then select the target application, for this guide I will select ‘Minecraft Java Edition’.
After you’ve filled in your option click on ‘Create Instance’.
Managing Instances
On the ‘Instances’ menu click on the “Manage” button of the instance you want to manage, after that you should be taken to the instance’s management page. In this page you can view the status of the instance, console output, configure the server, see installed plugins, manage the instances file system and see/take backups. The previously mentioned options might change according to the game server you are running.
Configuring automatic backups
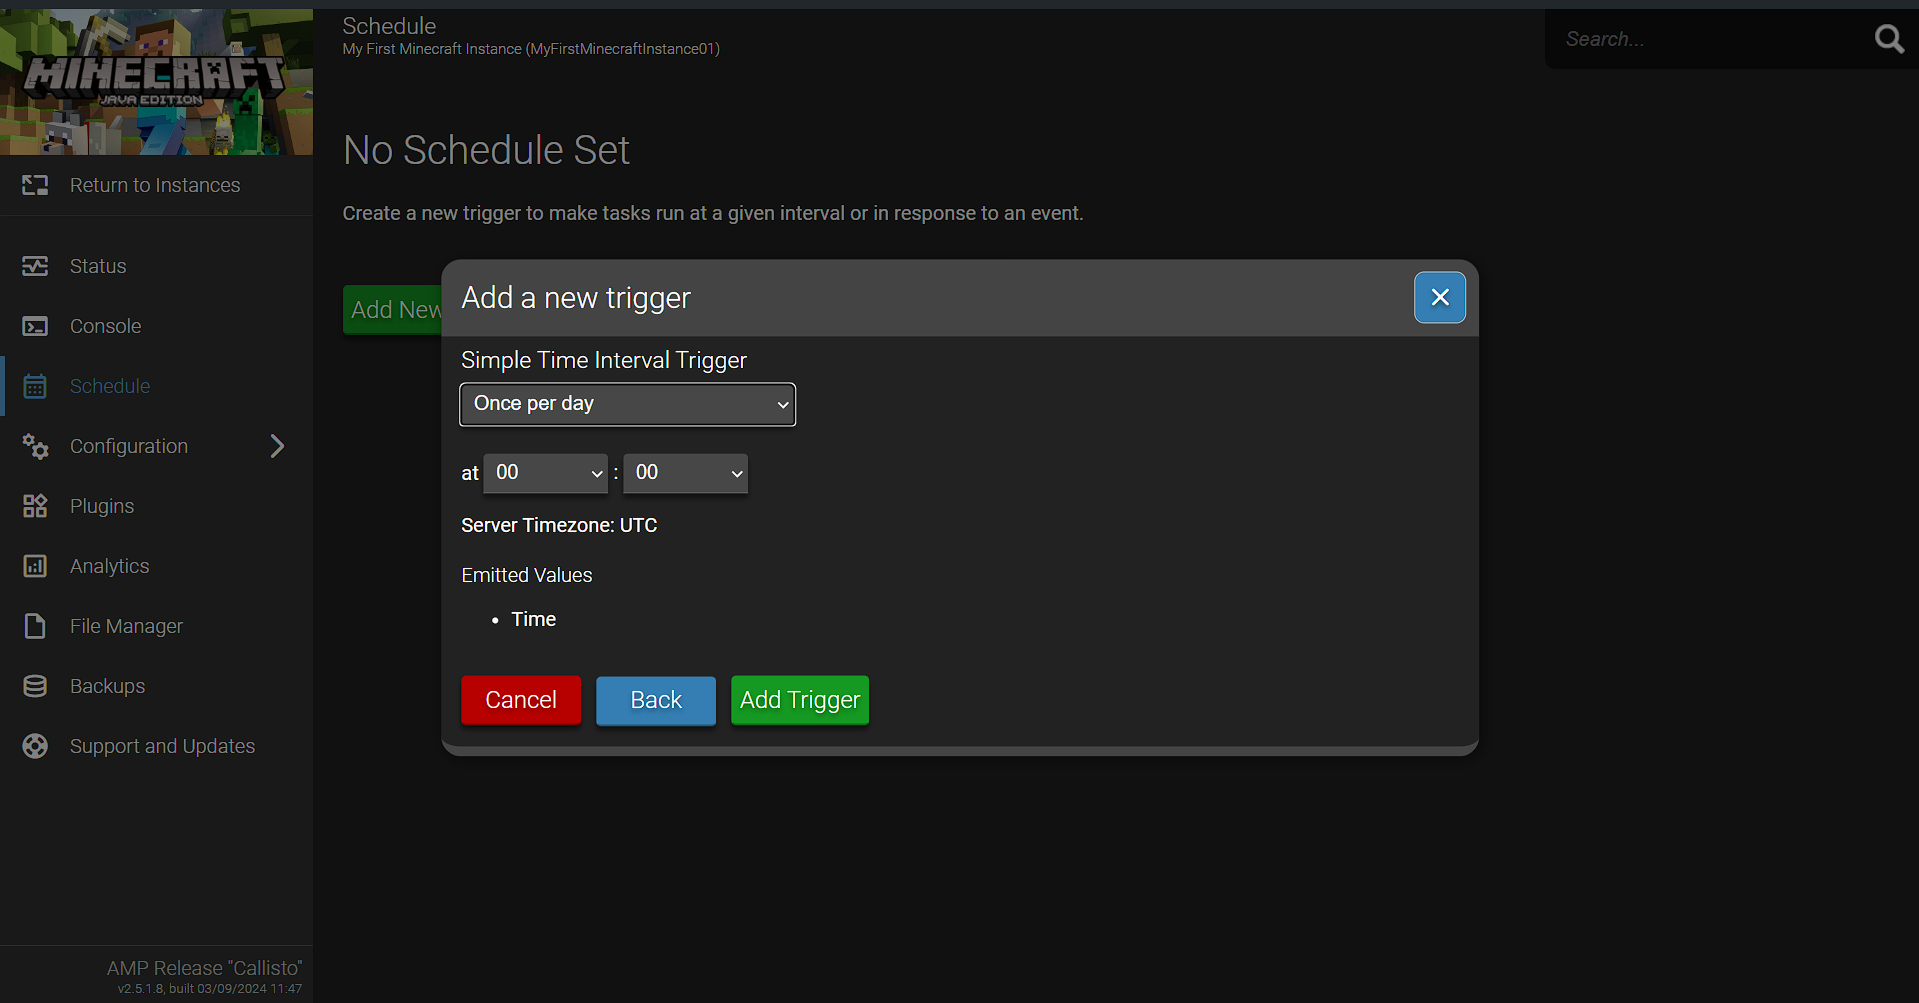
To configure automatic backups head to the ‘Schedule’ tab of the instance you want to backup, then click on add new trigger -> Simple Time Interval and choose when you want your backups to take place, I will be choosing everyday at midnight
After the trigger is added click the ‘Add New Task’ button, select the ‘Take a backup’ task from the dropdown menu and click on the ‘Add Task’ button.
If you want to take more backups repeat the steps as many times as you want.
Automatic backup management
If you want to tweak the automatic backup deletion parameters go to the Configuration Tab and then to the Backups tab. Here you can change the Backup Replacement Policy (I recommend Delete single oldest), backup compression, global storage limits (how much space all the backups can take), single backup size limit (how much space can a backup use) and backup count limit (limits how many backups are kept if none of the previous limits have been exceeded).
Community Support
Currently AMP offers tree communities, discourse, discord and patreon. Although I never had the need to reach out for help in any of these communities from what I’ve seen they are very active and the people there are nice, knowledgeable and eager to help.
Conclusion
AMP is a powerful and user-friendly tool that simplifies game server hosting for both beginners and advanced users. It features a clean interface that makes managing, backing up, and scheduling tasks easy, removing the hassle from server management.
AMP supports a wide range of popular games like Minecraft, ARK, and Rust, and can even handle NodeJS and Python applications, offering flexibility beyond gaming. With its built-in SFTP server, advanced file management, and automated backup options, it provides everything needed to run servers smoothly.
The tiered pricing model caters to different users. The Standard Edition is perfect for individuals or small groups, while the Professional Edition is ideal for power users managing multiple servers. The Advanced Edition suits larger networks with additional features like in-game analytics, while the Enterprise Edition offers advanced tools for commercial resellers.
Installation is straightforward, whether on bare metal or in containers like Proxmox, and AMP’s built-in Docker support ensures isolated and secure environments. Once set up, the user-friendly web interface makes it easy to manage instances, schedule backups, and monitor server performance.
With a supportive and active community, AMP is a reliable solution that simplifies server hosting. Whether you’re a casual gamer or a commercial reseller, AMP’s flexibility and ease of use make it a valuable tool for managing game servers.
In my personal experience over the past three years, AMP has been an indispensable tool, consistently performing well without any issues, and making my life as a game server host significantly easier. If you’re looking for a reliable, versatile, and scalable game server control panel, AMP is definitely worth considering.

